


Motorcycle Headlight Upgrade on a Suzuki VX800
Customer Review: Upgrading the Headlight Bulb on a Suzuki VX800 Motorcycle
I've got a Suzuki VX800 motorcycle, and like many older single headlight bikes, the light output on both dipped or main beam is poor. The low output limits visible distance at night, and so limits speed, and also means that the blinding effect of oncoming vehicles is more pronounced.
I chose an Osram Night Breaker Unlimited +110% bulb with a H4 fitting suitable for the bike. These bulbs claim to give 110% more light output, but still fit into the standard fitting, and draw the normal 60/55 watts. This means that they are a direct replacement to the existing standard headlight bulb. I did consider upgrading to a Xenon HID headlight, but a proper upgrade kit costs considerably more, and requires adding a ballast unit and modifying the bulb wiring.
Fitting the new Osram Night Breaker Headlight Bulb
The process for replacing the bulb is exactly the same as for most single lamp 'naked' motorcycles. Here's a quick summary:
- First job was trying to get into the Osram Night Breaker packaging! Remove all the paper cover, press on the top of the case to unclip it, and then slowly work the front half and back half apart. They are held together by tabs at the top and bottom, and take a little force to get apart.
-
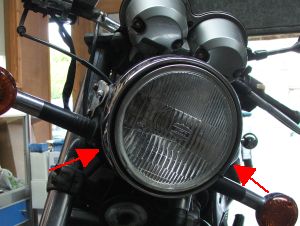 Unscrew the headlight unit retaining screws - on this bike, they are on the sides of the headlight unit (arrowed). The screws can corrode, in which case apply some penetrating oil and wait for 10 minutes to prevent you rounding the heads off. Take care not to alter the smaller screw at the front. This is used to adjust the angle of the beam to prevent dazzling oncoming traffic. Once unscrewed, the headlight unit will pull forward out of the rear cover.
 -
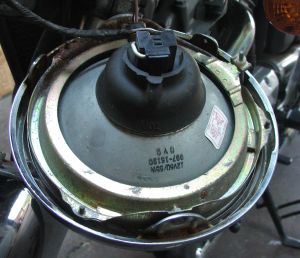 Disconnect the power cables to the headlight bulb, and the parking light bulb. Once this is done, you can remove the rubber waterproofing cover, and unscrew the retaining ring by turning anticlockwise by a small amount. The bulb should now lift straight out of the fitting. If it's still working, put it to one side as an emergency spare!
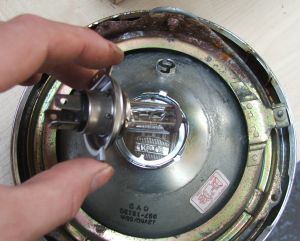 Now remove the existing bulb and replace with the Osram Night Breaker +110%. Take care not to touch any part of the glass with your fingers, as dirt or oil can cause the bulb to overheat and possibly shatter. The H4 bulb will only go in one way round to ensure the dipped and main beam works correctly.
- Replacement is the opposite of removal. Place the retaining ring back on to the fitting and turn a small amount clockwise to lock into place. Replace the rubber waterproofing cover, and ensure a close fit to the headlamp body. Take the unit back to the bike and reconnect the headlight and parking light power connectors. Put the headlight unit back into the rear cover, ensuring the screw holes line up. Replace the retaining screws, taking care not to over-tighten them.


Does it Work?
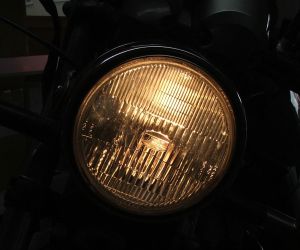
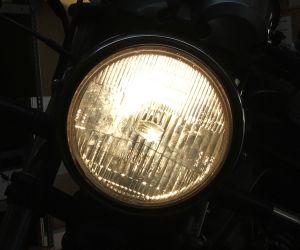
Now for the moment of truth: is the extra cost for the Osram Night Breaker +110% bulb worth it? I've done a before and after shot. In both cases, the camera was locked to the same settings (1/500th at F4) so that you can compare the light output.
 Headlamp with Standard Bulb |
 Headlamp with Upgraded Bulb |
You can see from the before and after images that there does seem to be a considerable increase in light output. The slight change in the background is because the sun came out as I was swapping the bulb over!
In practice, riding through Dorset countryside on a dark night, the new bulb gives considerably greater visibility at long range, giving reflections from road signs and cats eyes for a massive distance on straight roads. Even on dipped beam, the extra light gives better visibility of the road surface ahead when facing oncoming traffic. No-one flashed me or otherwise indicated that the new lights were blinding them, so the beam pattern has not been affected.
On main beam, it's much easier to see further into corners. The light is brighter and whiter, which allows for more scatter, so even objects not in the direct path are more visible. For a cost of �14.99 for a pair of bulbs from ABD.co.uk (I saved one as a spare), the Osram Night Breaker has to be the most cost-effective upgrade I have made!
ABD.co.uk,
Unit 4 Hollybrook Road,
Southampton,
Hampshire
SO16 6RB
England
Terms & Conditions | Privacy Policy | XML Sitemap | © 2005-2025 ABD Supplies Limited. All Rights Reserved.
